How to Reply to an Email with a Meeting Invite in Outlook: The Ultimate Guide to Save Time & Avoid Confusion
Key Takeaway
Replying to an email with a meeting invite in Outlook can significantly enhance productivity and communication efficiency by avoiding multiple back-and-forth emails and streamlining the scheduling process. The Meeting feature in Outlook allows you to propose a meeting with all the necessary details, such as date, time, attendees, and location, while keeping the email conversation context intact. To reply to an email with a meeting invite in Outlook, open the email in a new window and then from the top ribbon menu, select Message > Reply with Meeting (Ctrl+Alt+R). Read the full article to get a step-by-step guideline on this for Windows, Mac, and web versions.
Introduction
Do you often find yourself exchanging back-and-forth emails with colleagues or clients due to disagreements or miscommunication? Fortunately, you can avoid wasting time and confusion by replying to the email with a meeting invite in Microsoft Outlook. This feature allows you to propose a Teams or Skype meeting with details such as date, time, attendees, and a link to the meeting while keeping the context of the email conversation intact. In this article, we’ll provide a step-by-step guide on how to reply to an email with a meeting invite in Outlook.

The Importance of Replying to Emails with Meeting Invites in Outlook
Replying to an email with a meeting invite in Outlook is an essential feature that can significantly enhance your productivity and communication efficiency. By using this feature, you can avoid the need for multiple emails back and forth with colleagues or clients on a particular issue, which saves you time and reduces confusion. Sometimes, written emails may fail to convey the intended message to the reader, making it necessary to have a direct conversation (meeting).

Additionally, in some situations, email communication requires a follow-up meeting. You can propose a Microsoft Teams or Skype meeting with a structured format that includes all the necessary details, such as the date, time, attendees, and location, and keep the context of the email conversation intact. This approach helps you to streamline your scheduling process, collaborate more effectively, and present a professional image to your clients or partners. Using the Outlook calendar to arrange a meeting also ensures that you can book the time of all the invitees ahead of time, which further increases your and your coworkers’ efficiency and productivity.
Overall, replying to an email with a meeting invite in Outlook is a simple yet powerful way to improve your communication and productivity in the workplace, especially in remote settings.
How Reply with a Meeting Invite Works
We typically send out meeting requests with a blank slate, starting from scratch. We may add the agenda or any other details in the invitation body or the attachment. But it doesn’t have any mail trail. However, when you reply to an email with a meeting invite, the meeting invite is appended to the original email thread along with the entire previous email conversation.
When you organize your messages by ‘conversation view’ in Outlook, a meeting request created using the “Reply with Meeting” feature is automatically stacked to the same conversation thread. This means that the meeting request will be visible within the expanded conversation threads.
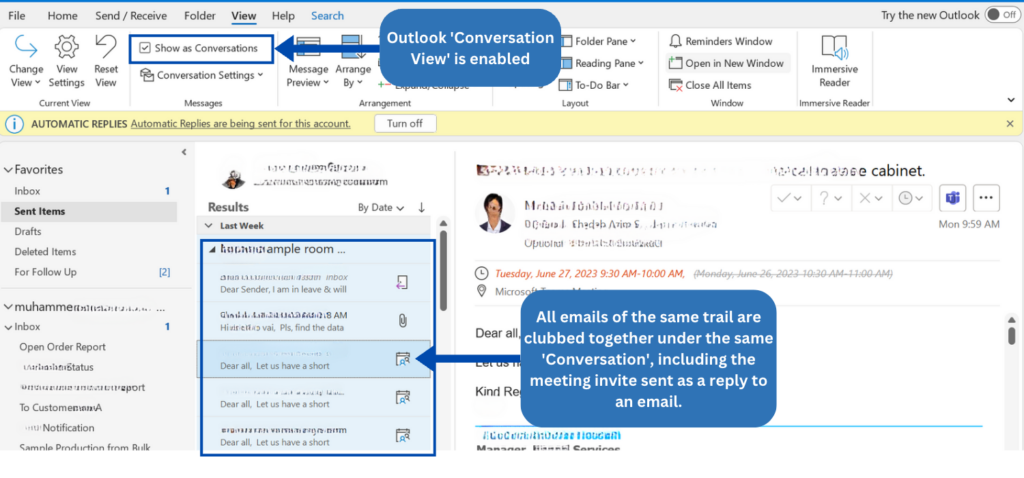
If you select “Meeting” for a conversation that is not expanded and includes multiple branches, the meeting request will be linked to the most recent message in the selected branch.
However, the “Meeting” command will not be available if you select a conversation header.
How to Reply Email with Meeting Invite: A Step-by-Step Guide for Outlook App for Windows PC
Without further delay, let’s dive directly into how to reply to an email with a meeting invite in Outlook. We will cover all variations, i.e., Outlook desktop app for Windows, Mac, and Web versions. Let’s start with the Outlook desktop app for Windows.
Step 1: Open the email
First, open the email on a new window that you want to reply to with a meeting invite in Outlook. You can do this by double-clicking on the email.
Step 2: Click on “Meeting” or “Reply with Meeting”
Next, you can find the option to reply with a meeting in two places.
A 3-dot “more options” button is in the email window’s upper-right corner. Inside that, there is a “Meeting” option.
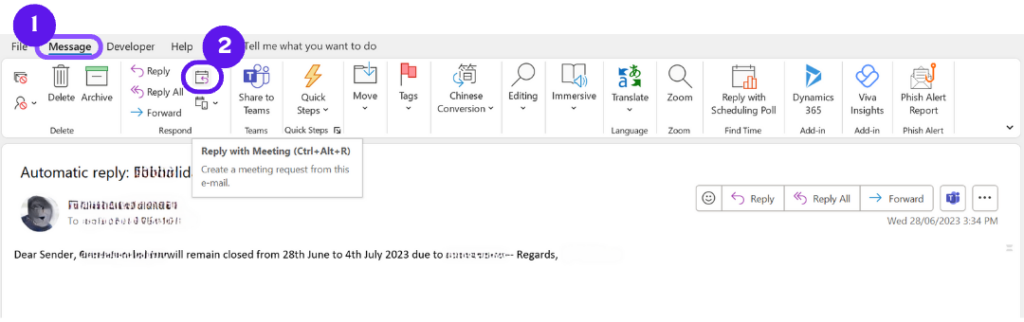
Alternatively, under the “Message” section in the top menu, there is the “Reply with Meeting” option. You can also use a keyboard shortcut Ctrl+Alt+R to execute this.
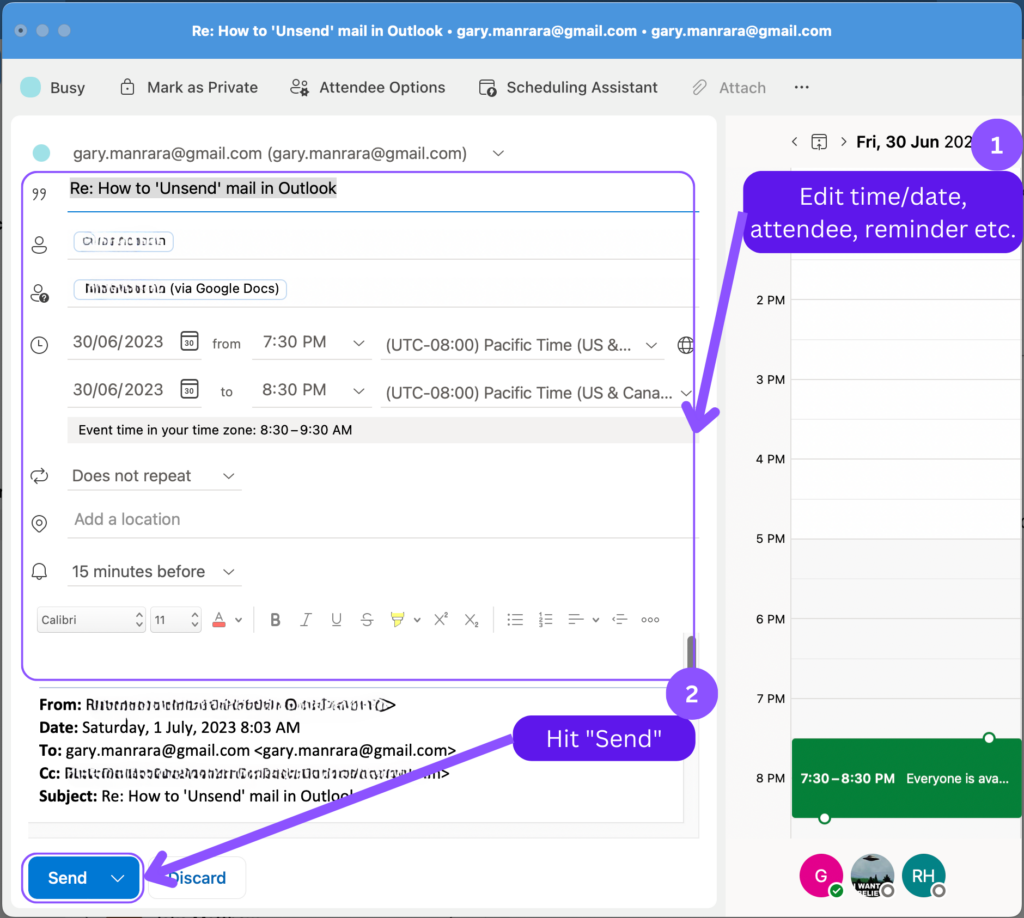
Step 3: Fill in the meeting details
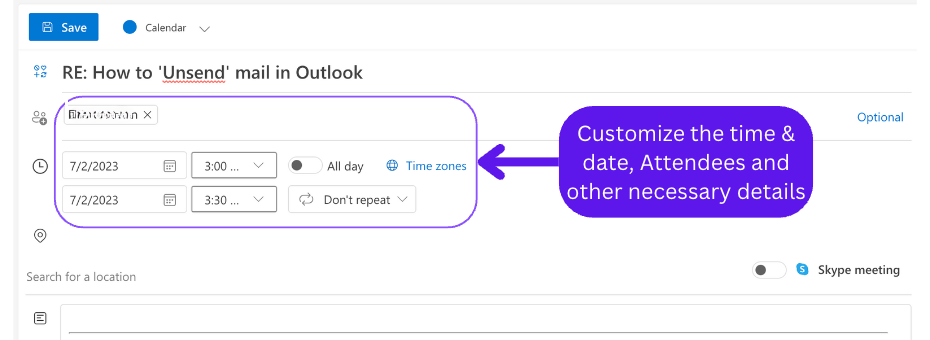
You can now fill in the meeting details in the invite form. Start by specifying the subject of the meeting. Then, choose a date and time for the meeting by clicking on the “Start Time” and “End Time” fields and selecting a date and time from the calendar. You can also specify the time zone, the duration, and the location of the meeting.
Microsoft support confirms the meeting request invites everyone who was on the To line in the original message as Required Attendees and everyone on the Cc line as Optional Attendees.
If you want to add more attendees, click on the “Required” or “Optional” fields and select the names or email addresses of the people you want to invite.
You can include any custom message, agenda, or attachments as you usually would.
Step 4: Send the meeting invite
Once you have filled in all the meeting details, click on the “Send” button to send the meeting invite to the attendees. They will receive an email with the meeting details and the option to accept, decline, or propose a new time, just like any other meeting invitation. You will also receive notifications when the attendees respond to the meeting invite, and you can track their status in the “Meeting” tab of your calendar.
How to Reply Email with Meeting Invite: A Step-by-Step Guide for Outlook Web Version
Let’s now see how this feature works with the Microsoft Outlook web version.
Step 1: Find and select the email
First, find and select the email from your inbox.
Step 2: Choose “Reply all by meeting”
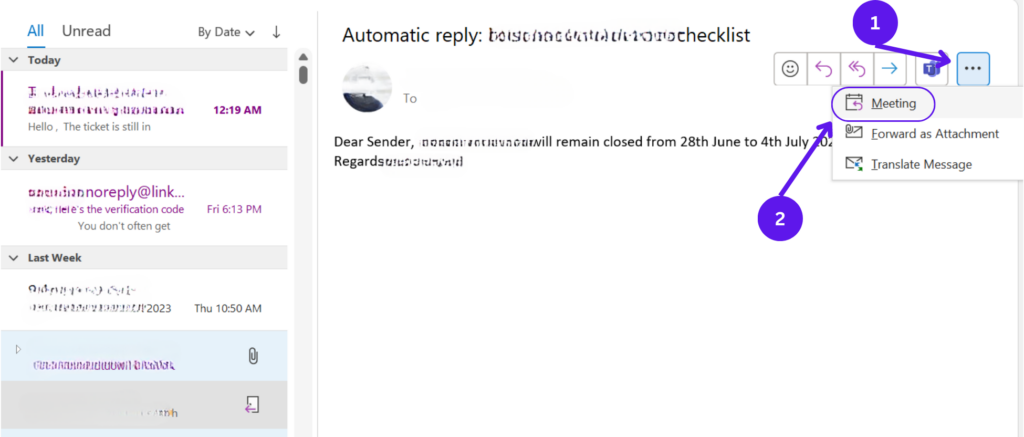
A 3-dot “more options” button is in the email window’s upper-right corner. Inside that, there will be “Other reply actions” > “Reply all by Meeting”.
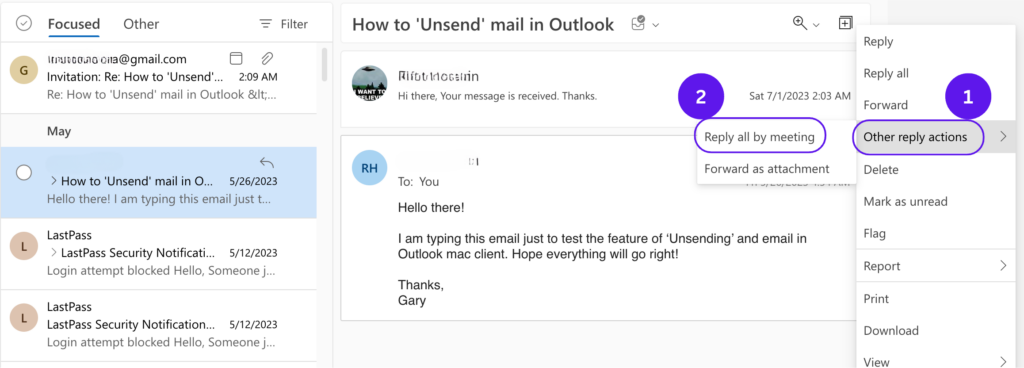
Step 3: Fill in the meeting details and Send
Now, you can fill in the meeting details in the meeting invite form and send it as usual.
Watch it in a video tutorial instead!
How to Reply Email with Meeting Invite: A Step-by-Step Guide for Outlook for Mac
Let’s now see how you can use this feature in Outlook for Mac.
Step 1: Find and select the email
First, find and select the email from your inbox.
Step 2: Right-click and “Create” a meeting
Right-click on the message, and a menu will appear. Select “Create” > “Meeting” or “Appointment”.
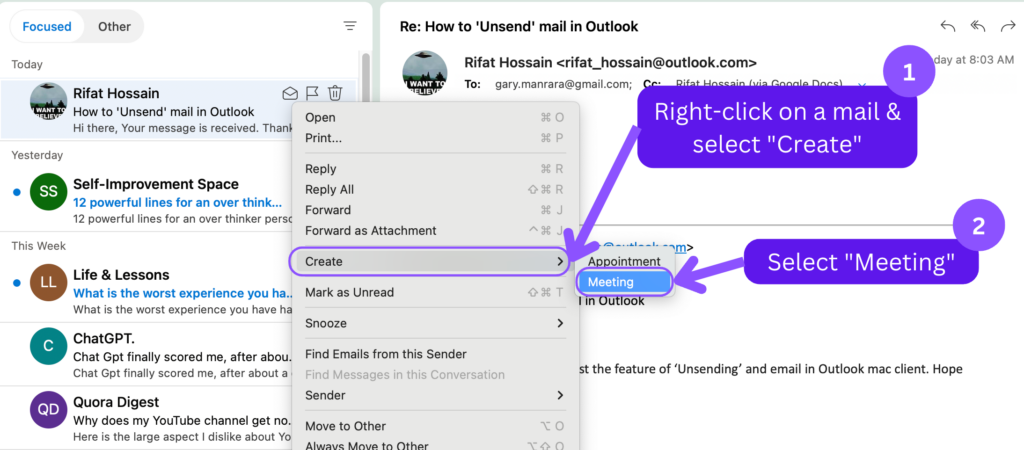
Step 3: Fill in the meeting details and Send
Now, you can fill in the meeting details in the meeting invite form and send it as usual.
Not a great reader? Watch this tutorial in a video!
Bonus Tips on Using the Reply with Meeting Invite Feature in Outlook:
- Check the availability of the attendees before proposing a date and time to avoid conflicts or overlaps.
- By default, the meeting subject will match the original email title. However, use a custom subject line if the original subject doesn’t make sense.
- Attach any relevant documents or materials to the meeting invite to prepare the attendees and avoid delays.
- Follow up with the attendees if they haven’t responded to the meeting invite or if there are any changes or cancellations.
Final Thoughts
In conclusion, replying to an email with a meeting invite in Outlook is a useful feature that can simplify and streamline your scheduling process. By following the steps outlined in this article and using the tips provided, you can create effective and professional meeting invites that save you time, increase your productivity, and ultimately stay organized. You also like our other piece of write-ups on “How to BCC in Outlook calendar invite” and “Why shared calendars aren’t showing in Outlook”.
Frequently Asked Questions
How do you reply to an email with a meeting invite in Outlook?
You can reply to an email with a meeting invite in Outlook by following the steps below.
1. Open the email in a new window
2. Click on “Reply with Meeting” under the “Message” section in the top menu (shortcut: Ctrl+Alt+R)
3. Customize the date and time, invitees, reminder setup, etc.
4. Send.
How do you reply to an email with a meeting in Outlook for Mac?
To reply to an email with a meeting invite in Outlook for Mac, follow the steps below:
1. Find and select the email in your inbox
2. Right-click on the message and choose “Create” > “Meeting” or “Appointment” from the menu
3. Fill in the meeting details in the meeting invite form
4. Send the invitation as you would normally do.
How to reply with Teams meeting invite in Outlook?
To reply with a Teams meeting invite in Outlook, follow the steps below:
1. Open the email in a new window by double-clicking on it.
2. Click on “Meeting” or “Reply with Meeting” in one of two places: the 3-dot “more options” button on the upper-right corner of the email window or under the “Message” section in the top menu (shortcut: Ctrl+Alt+R).
3. Fill in the meeting details, such as subject, date, time, duration, location, and attendees.
4. Add additional attendees if needed by selecting their names or email addresses.
5. Include any custom message, agenda, or attachments.
6. Click on “Send” to send the meeting invite.
7. Attendees will receive an email with the meeting details and can accept, decline, or propose a new time. You will receive notifications and can track their responses in your calendar’s “Meeting” tab.
Note that, depending on your organizational setup, it could be MS Teams or Skype.

“Hey there, welcome to UplifeWay.com! I’m Rifat Hossain, a Microsoft 365 certified trainer with a background in Advanced Engineering Management. Currently, I’m navigating the tech landscape as the Digital Services Manager at Coats, providing a unique perspective on technology in the professional world.
My journey, fueled by a passion for helping others, has led to the creation of this blog. UplifeWay.com is your go-to source for mastering Microsoft Office applications and elevating your digital literacy. Join me on the exciting journey of smart productivity at UplifeWay.com – let’s explore the world of tech together!”