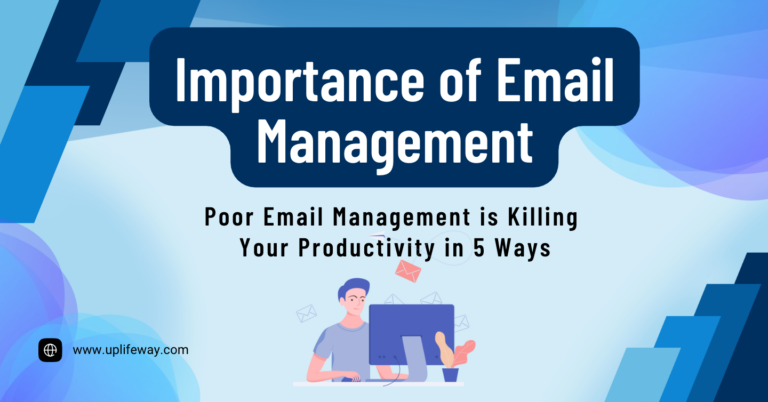
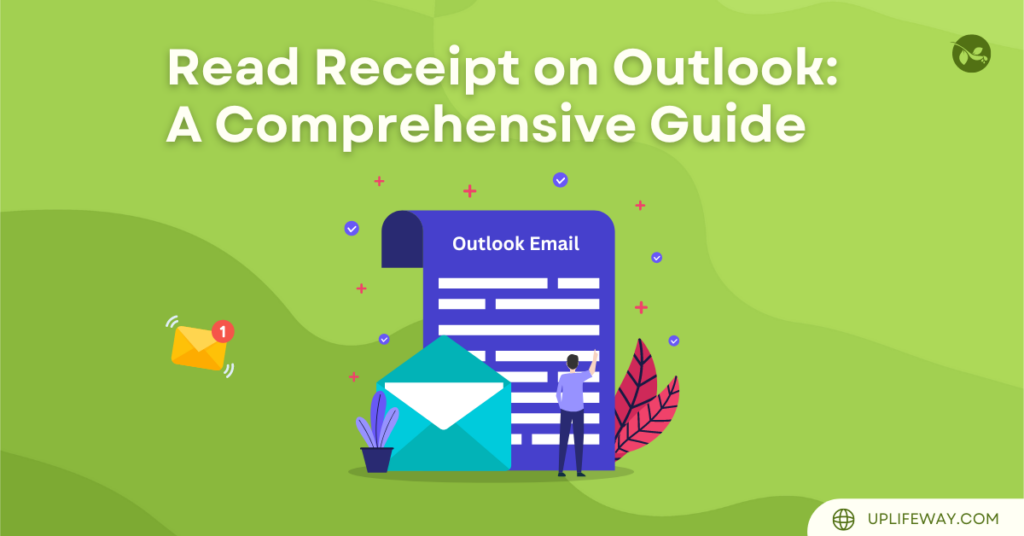
3 Benefits of Using Read Receipt on Outlook Emails: A Comprehensive Guide
Key Takeaway
- Read receipts on Outlook can hold recipients accountable, allow for timely follow-ups, and assist in time management.
- Adding a read receipt is straightforward on both Mac and Windows.
- Recipients will know when a read receipt is requested; this is how Microsoft has designed the feature. However, there are a few workarounds for requesting Outlook read receipts without the recipients knowing.
- Outlook allows users to request a read receipt for a single email or enable it for all outgoing emails.
- Read receipts could be disabled by recipients who do not wish to send them.
Introduction
Fed up with ambiguous responses and uncertainty about whether your emails are being read or not? Therein lies a quiet power in Microsoft Outlook—the read receipts. Haven’t heard of it? Time to put an end to this guessing game. Whether you’re using Outlook on Mac or another platform, the read receipt option is here for your rescue. Stay with us to uncover how to add a read receipt in Outlook and easily track your sent emails. Let’s dive in!
Recommended reading: How to show working elsewhere in Outlook calendar and 4 ideal scenarios for its use.
What is a Read Receipt in Outlook?
Read receipt is a nifty feature in Microsoft’s time-tested email client, Outlook. When enabled, this feature confirms that the recipient has opened your email. This information can be immensely beneficial in various scenarios, from business correspondence to the concurrent exchange of ideas within a team.
Why Use Read Receipts?
Adding a read receipt in Outlook can help in the following ways:
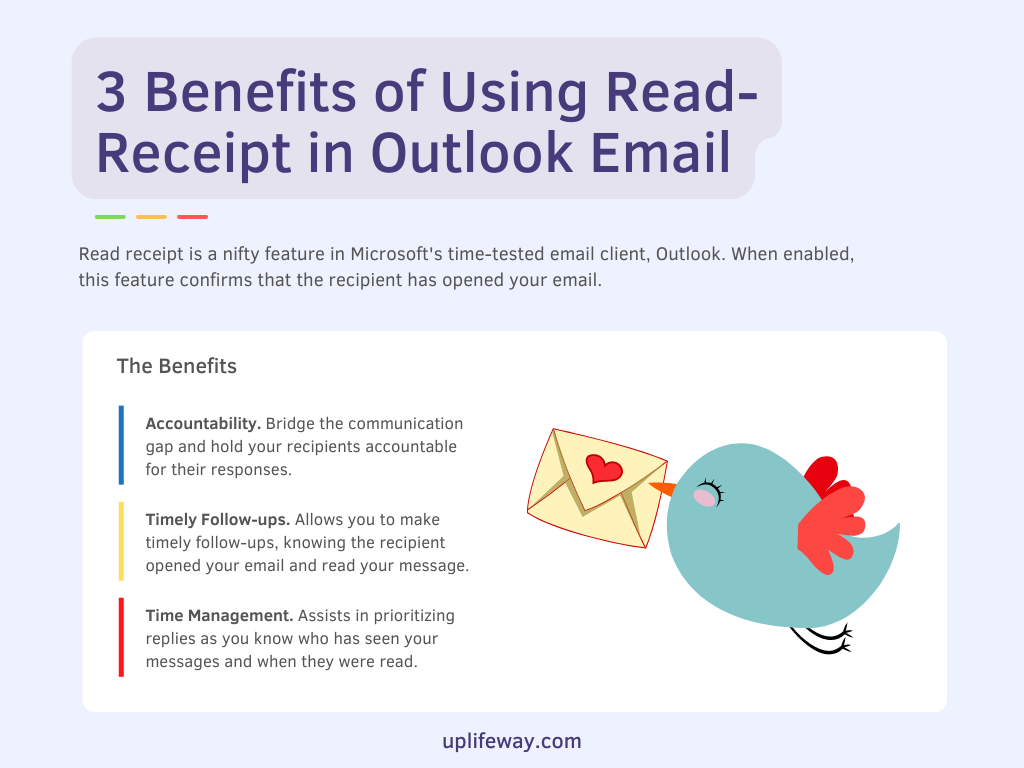
- Accountability: Bridge the communication gap and hold your recipients accountable for their responses.
- Timely Follow-ups: Allows you to make timely follow-ups, knowing the recipient opened your email and read your message.
- Time Management: Assists in prioritizing replies as you know who has seen your messages and when they were read.
Recommended reading: A Simple 6-Step Guide to Creating and Using Outlook Calendar Templates: Setup Your Next Meetings in No Time.
How to Add a Read Receipt in Outlook?
If figuring out how to put a read receipt on Outlook seems daunting, don’t worry! The steps are straightforward whether you request a read receipt on Outlook for Mac, Windows, or any other version.
Requesting Read Receipt in Outlook for Windows
In Outlook for Windows users, the steps are pretty straightforward:
- Open Outlook and click on New Email.
- From the “Options” tab in the new window, navigate to the “Tracking“ group.
- Check the box next to “Request a Read Receipt.”
- Write your email and press send.
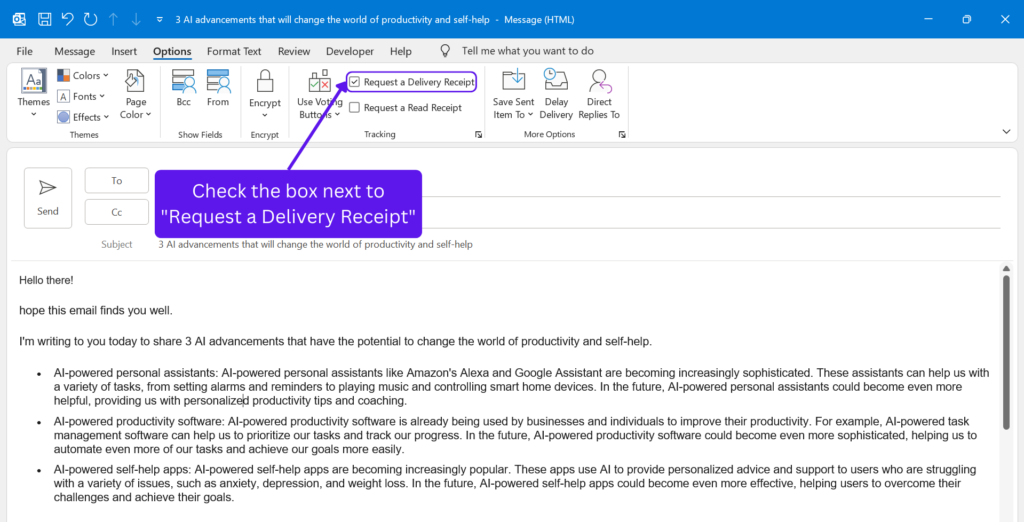
Congratulations, you just learned how to get a read receipt in Outlook. Remember, though, the recipient can choose whether to send the read receipt or not. Yet, in a professional setting, the acknowledgment will likely be sent.
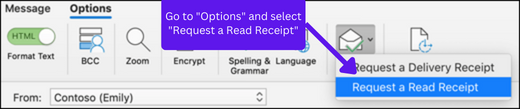
Adding Read Receipt in Outlook Mac
Only certain versions of Outlook for Mac offer read receipts. These features are accessible when using a Microsoft 365 work or school account or an Exchange Server account managed by your organization. However, this functionality is not available for those with free Outlook.com accounts or for IMAP or POP accounts like Gmail, Yahoo!, or iCloud.
You can verify your account type by navigating to Tools > Accounts.
Here is how to send a read receipt in Outlook Mac:
- Open Outlook and select New Email.
- Go to the “Options” tab in your compose window, find and click the “Request Receipts” button.
- Select the box saying “Request a Read Receipt.”
- Compose your email and hit send.
Adding Read Receipt in Outlook Web App (OWA)
You can request a read receipt in Outlook Web App (OWA) as well. Here are the steps you need to follow:
- Open Outlook Web App and create a new email.
- Go to the “Options” tab in your compose window, under the “Tracking” group, find and tick on the checkbox next to “Request Receipts.”
- Write your email and send it.
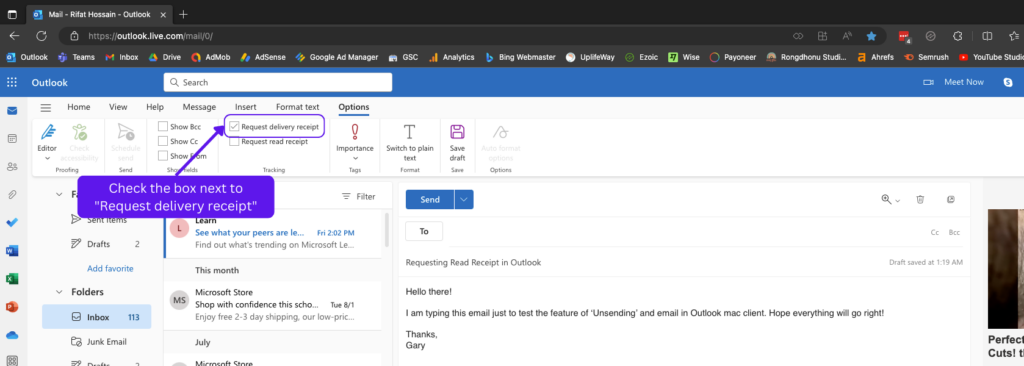
Thats it! The email recipient will now get a request for a read receipt.
Watch this simple video on how to request read receipt on Outlook web.
Recommended reading: How to Reply to an Email with a Meeting Invite in Outlook – The Ultimate Guide to Save Time & Avoid Confusion.
Read Receipts without the Recipients Knowing?
Now, you might be wondering- can you send a read receipt in Outlook without the recipient knowing? Due to privacy concerns, Microsoft has designed the feature, so recipients know when a read receipt is requested.
However, it’s worth noting that you can implicitly track read statuses with the right Outlook management tools. While this goes beyond the inbox’s native capacity, third-party add-ins can extend the functionality. Here are some of them:
- Yesware does something pretty clever. They sneak a tiny pixel into the emails you send out. It’s like a secret spy that nobody can see. When the person you sent the email to opens it, that little pixel wakes up and sends you a message. It tells you if your email has been opened or not. The best part is the person who receives the email won’t have a clue that this is happening.
- ReadNotify is another option. One types their email as they normally would, but before they hit send, they need to add “.readnotify.com” at the end of the recipient’s email address. So, if the email would be sent to drakecn@yahoo.com, it needs to be written as drakecn@yahoo.com.readnotify.com. This move makes the email go through a certain server first, where it gets tagged with a special code. When the recipient opens the email, this code sends back a signal to the server with the exact date and time. This way, the sender can be informed about when their email was actually read. Neat, right?
- ContactMonkey. It delivers complete visibility into your email tracking data directly from MS Outlook’s distribution list.
Note
Using such tools to track email opens without the recipient’s consent can be considered a privacy infringement in certain regions or as per certain company policies. It is always advisable to inform the recipient about your email tracking activity and, preferably, get their consent. Moreover, using 3rd party tool can also create security risks for your mailbox. So, it is always better to check with your company IT before installing any 3rd party tool.
Read Receipt on Outlook: For One Email or All?
Before we dive into the nitty-gritty of enabling “Read Receipts,” let’s understand your options. Outlook allows you to request a “Read Receipt” for a single email or enable it for all outgoing emails. It’s crucial to decide which approach suits your needs.
Read Receipt for a Single Email: How to Request It?
The step-by-step tutorial we’ve previously covered will only add a read receipt to Outlook for a specific email. Therefore, if you want to request read receipts routinely, you’ll need to repeat these steps for each email. Now you might wonder, “What if I want to make requesting read receipts a default setting in Outlook?” I will answer that in the following section.
Read Receipt for All Emails: Enabling It Globally
If you frequently need to know when all your emails are read, enabling “Read Receipts” for all outgoing emails can save time. Here’s how you can set it up in your Outlook for Windows desktop client:
- Go to the “File” menu in Outlook.
- Select “Options” and navigate to the “Mail” section.
- Scroll to the “Tracking” section and check the box next to “Read receipt confirming the recipient viewed the message.”
- Click “OK” to apply the changes.
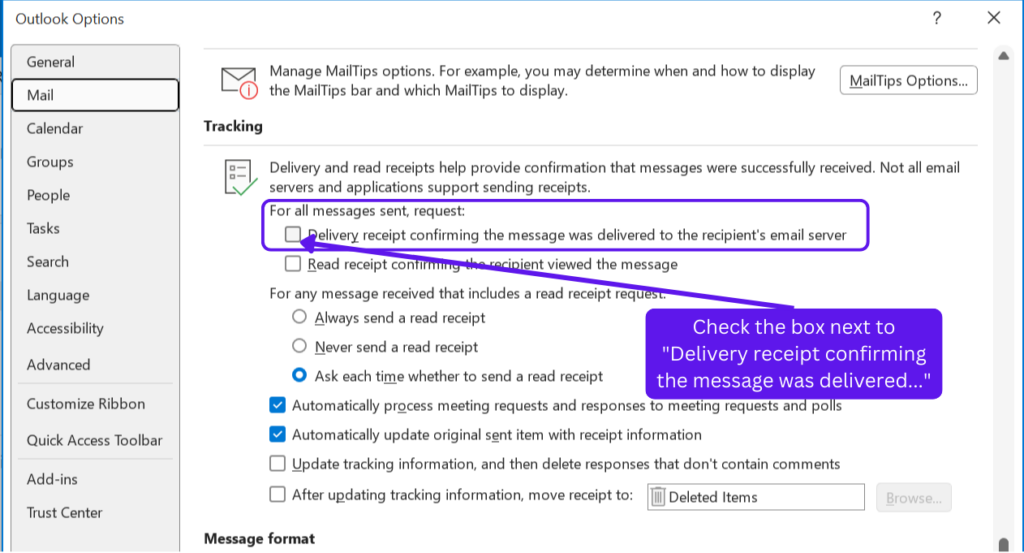
This is it! Outlook automatically requests a “Read Receipt” whenever you send an email without any additional steps. Consider carefully before enabling this option. Not every email requires a read receipt, and consistently requesting one may annoy your coworkers or customers.
Checking If an Email Has Been Read
Once you’ve requested a read receipt, your next move is to confirm if the email has been read on Outlook.
Here’s what happens when you send an email with a read receipt request: The individual on the receiving end gets a notification asking if they’d like to send a read receipt in Outlook.
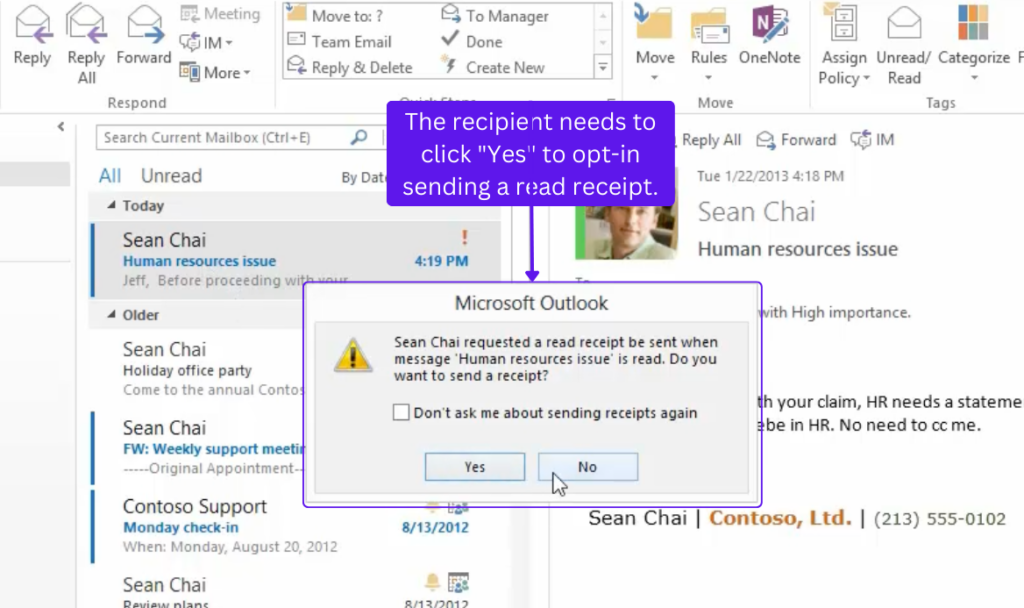
If they opt for “Yes,” Outlook alerts you with a confirmation notification indicating your email has been read.

However, it’s essential to be aware that the recipient can ignore your request. If this occurs, you won’t receive any read receipt notification.
Turn Off Outlook Read Receipts
When sending an email, you don’t need to do anything extra if you don’t want to request a read receipt. Just ensure the “Request Read Receipt” checkbox under the “Options” tab is unchecked, and no read receipt request will be sent with your email.
If you are on the receiving end and prefer not to send read receipts, you can disable the feature.
When you receive an email requesting a read receipt, a dialogue box will pop up in Outlook asking for your confirmation. All you have to do is click “No,” and the sender won’t receive a read receipt.
Perhaps you want to apply this setting universally to all your emails. To do so, navigate to your email settings in Outlook. Here, you’ll find an option you can unselect to turn off sending any read receipts. This way, your privacy is maintained each time you view an email.
Conclusion: Stay in the Know with Read Receipts
In conclusion, “Read Receipts” on Outlook are invaluable for staying informed about your email interactions. Whether you need confirmation on an essential message or want to track email opens discreetly, this feature has you covered.
So, next time you send an important email, consider using “Read Receipts” to gain insights into your recipient’s engagement. Embrace this email management hack and take charge of your inbox like never before!
Remember, this is just one of the many productivity tips you can discover on the Uplifeway blog. To explore more ways to enhance your professional development and Microsoft 365 expertise, keep reading our blog for insightful articles and helpful guides.
Get notified, stay informed, and elevate your email game with “Read Receipts” on Outlook! Happy emailing!
FAQs
How to add a read receipt in Outlook 365?
To request a read receipt for an individual email in Outlook 365, compose your email, go to the “Options” tab, and check “Request a Read Receipt.”
How to request read receipts in Outlook?
While composing the email, you can request read receipts for individual emails by checking the “Request a Read Receipt” box in the “Options” tab.
Where is the read receipt in Outlook?
In Outlook, you can find the option to request a read receipt in the “Options” tab (under the “Tracking” group) when composing an email.
How to put a read receipt on Outlook?
To request a read receipt in Outlook, open the email you want to send, go to the “Options” tab, and check “Request a Read Receipt.”
How to get read receipt on Outlook?
Once you request a read receipt for an email in Outlook, you will receive a notification when the recipient opens your email.
How to see if an email was read in Outlook?
If you have requested a read receipt for the email, you will receive a notification in Outlook when the recipient reads the email.
How do I request a read receipt in Outlook?
To request a read receipt in Outlook, check the “Request a Read Receipt” box in the “Options” tab while composing the email.
How do I add a read receipt in Outlook?
To add a read receipt in Outlook, compose your email, go to the “Options” tab, and check “Request a Read Receipt.”
How do you request a read receipt in Outlook?
To request a read receipt in Outlook, open the email you want to send, go to the “Options” tab, and check “Request a Read Receipt.”
How to get a read receipt in Outlook?
Once you request a read receipt for an email in Outlook, you will receive a notification when the recipient opens your email.

“Hey there, welcome to UplifeWay.com! I’m Rifat Hossain, a Microsoft 365 certified trainer with a background in Advanced Engineering Management. Currently, I’m navigating the tech landscape as the Digital Services Manager at Coats, providing a unique perspective on technology in the professional world.
My journey, fueled by a passion for helping others, has led to the creation of this blog. UplifeWay.com is your go-to source for mastering Microsoft Office applications and elevating your digital literacy. Join me on the exciting journey of smart productivity at UplifeWay.com – let’s explore the world of tech together!”