Outlook Email Backup and Restore Mastery: 5 Simple Steps to Ensure Your Data’s Safety
Key Takeaway
Backing up your Outlook data is crucial to avoid potential data loss; it’s a simple process that can save significant time and trouble. Here’s a quick synopsis of how to backup Outlook Emails, Contacts and Calendars and how to restore them when necessary.
How to Backup Outlook Emails
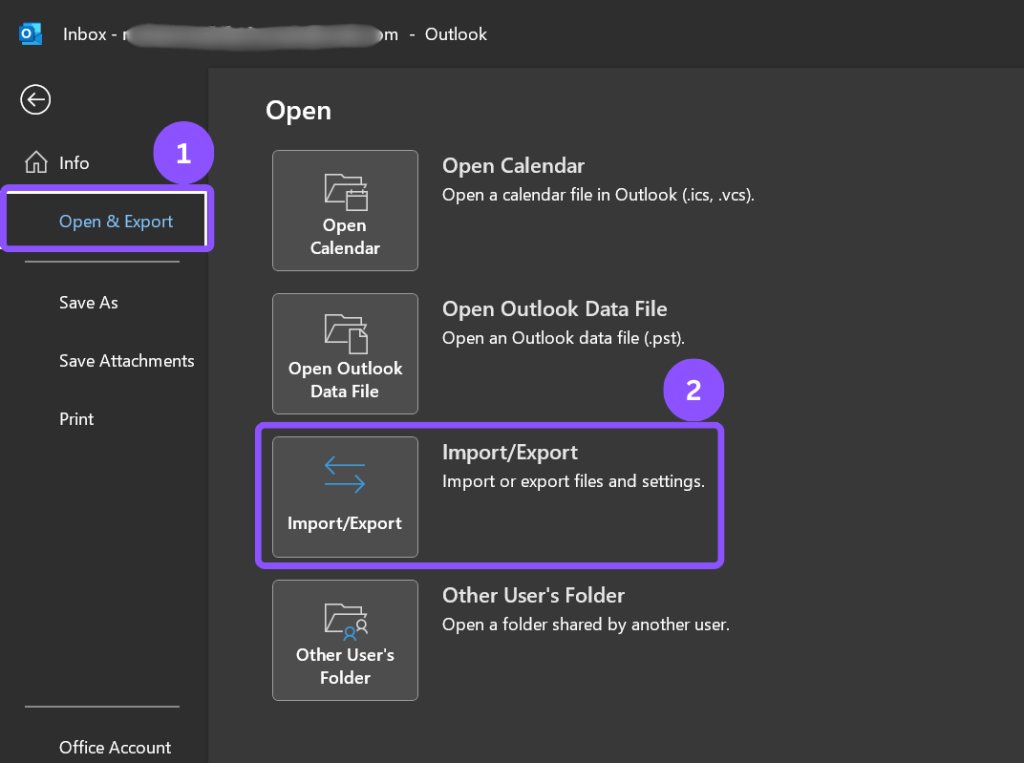
- Step 1: Open Microsoft Outlook and navigate to ‘File’ > ‘Open & Export’ > ‘Import/Export’ to open the wizard
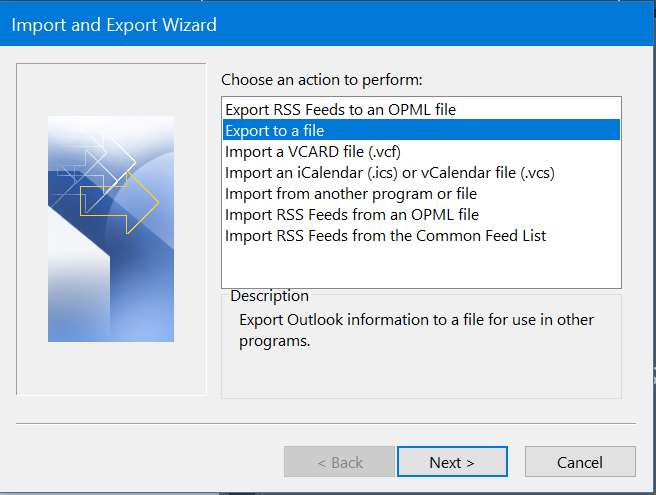
- Step 2: Select ‘Export to a file’, then click ‘Next’
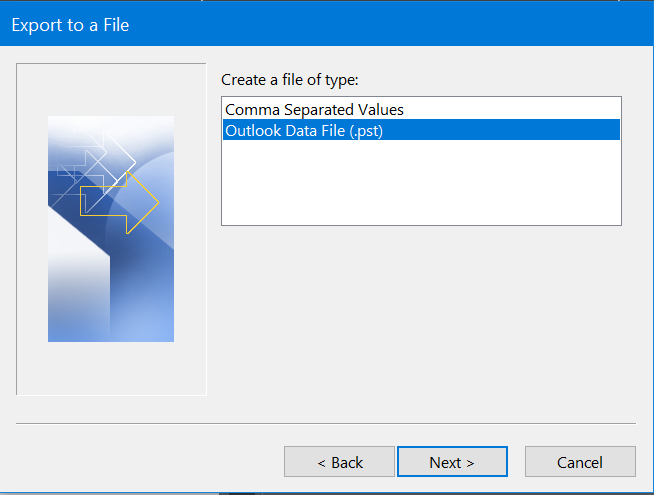
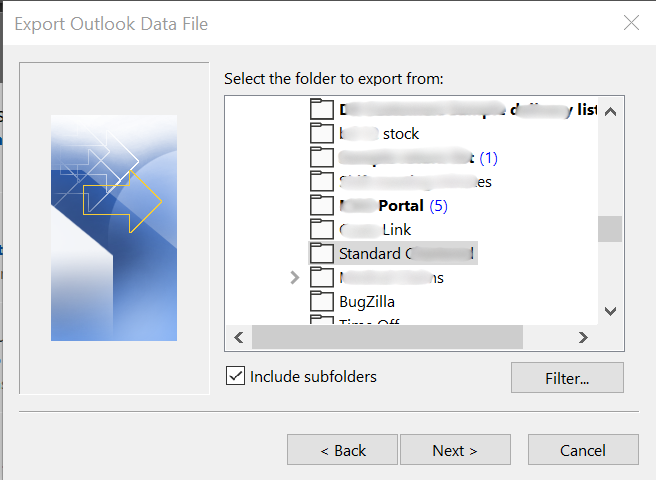
- Step 3: Choose ‘Outlook Data File (.pst)’ and the folders you want to backup, and click ‘Next’
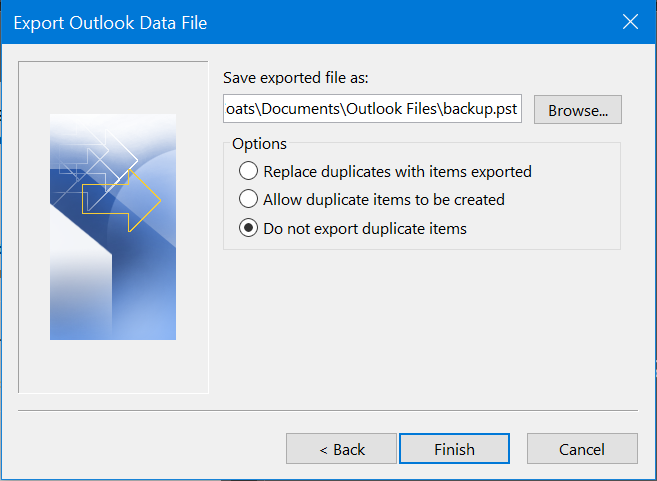
- Step 4: Decide on a destination for your backup file
- Step 5: Choose what to do with the Duplicate items and click ‘Finish’.
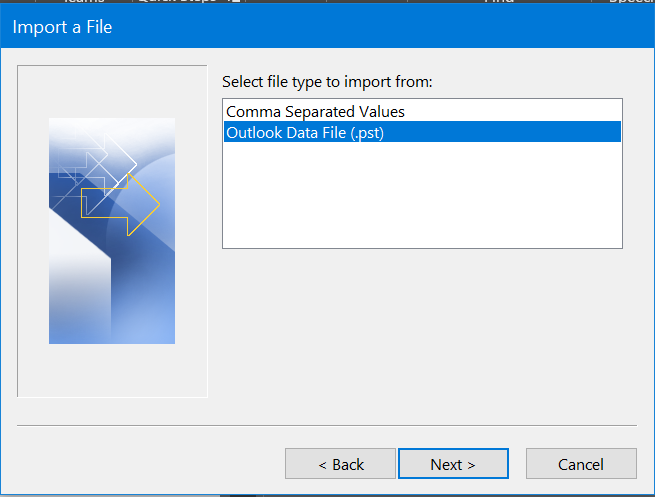
How to Restore an Outlook Backup
- Step 1: Open Microsoft Outlook and navigate to ‘File’ > ‘Open & Export’ > ‘Import/Export’
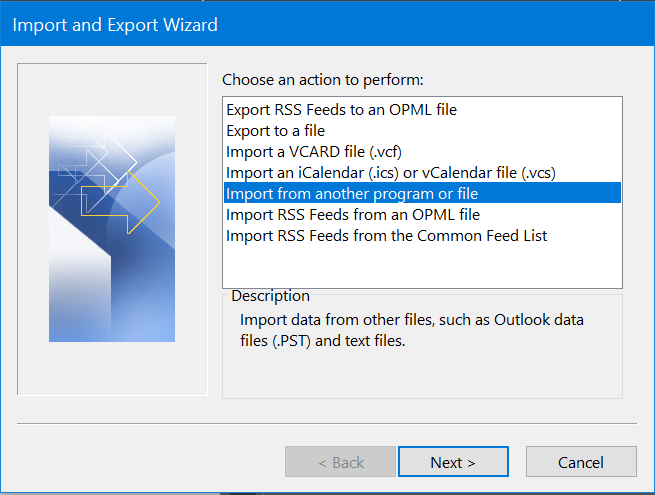
- Step 2: Choose ‘Import from another program or file’ and click ‘Next’
- Step 3: Select ‘Outlook Data File (.pst)’, hit ‘Next’
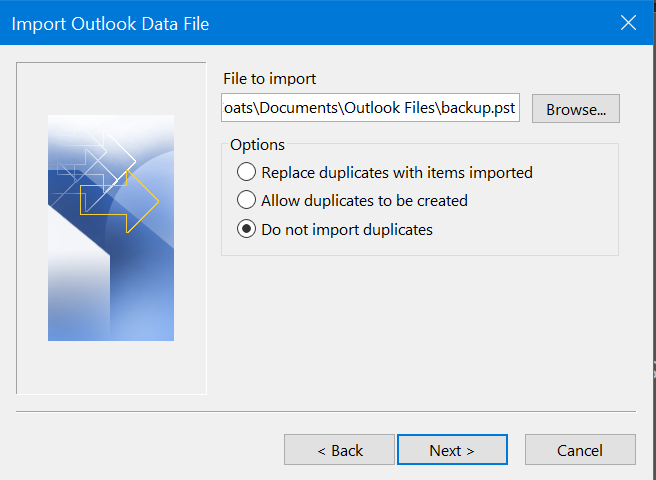
- Step 4: Browse to find and choose your backup file. Also, choose what to do with the duplicate items
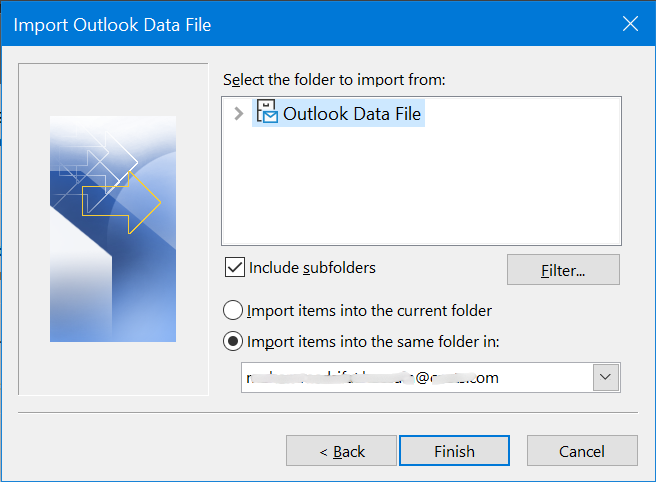
- Step 5: Select the destination folder and click ‘Finish’.
Introduction
Email is a critical component of daily communication, especially in business. Outlook is one of the most widely used email clients and is often the house of your essential information. Losing access to your Outlook emails can significantly threaten your personal and professional life. But unfortunately, technology can fail, and data loss can happen. Whether due to a software crash, hardware failure, accidental deletion, or a malicious attack, the risk of losing your precious Outlook email data is real and can be quite nerve-wracking.
Imagine losing years of critical business emails or your treasured personal correspondences. The sense of panic that accompanies such an event is immense. No one wants to find themselves in this situation, which can have severe consequences for your career or personal life.

Thankfully, proactive measures can prevent this nightmare scenario. The solution is a reliable Outlook email backup and restore strategy. You can secure your Outlook data and restore your peace of mind by following 5 simple steps.
You may also be interested in The Only 30 Mac Outlook Shortcuts You Need to Know!
How to Backup Outlook Emails Outlook
Below is a simple, step-by-step guide to help you create a backup of your Outlook emails.
Step 1:
Open Microsoft Outlook and navigate to ‘File’ > ‘Open & Export’ > ‘Import/Export’ to open the wizard.
Step 2:
Select ‘Export to a file’, then click ‘Next’.
Step 3:
Choose ‘Outlook Data File (.pst)’ and the folders you want to backup, and click ‘Next’.
Step 4:
Decide on a destination for your backup file.
Step 5:
Choose what to do with the Duplicate items and click ‘Finish’.
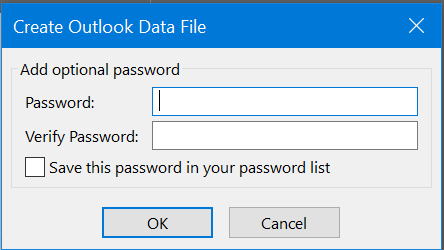
Step 6 (Optional):
Set a password to protect your Outlook data file.
You might have to wait for the backup to complete. Finally, a PST (Outlook backup file) file will be generated in the destination folder.

A Few Important Notes
Locate Your Outlook Email Backup File Location
In Outlook email backup Windows 10, the typical location for your backup file is within the Documents\Outlook Files directory.
The path of your Outlook email backup file location is usually as follows:
C:\Users\USER_NAME\Documents\Outlook Files\backup.pst or, C:\Users\USER_NAME\OneDrive\Documents\Outlook Files\backup.pst
Outlook email backup file extension
Outlook stores emails, contacts, and calendar data in a single backup file with a .pst or .ost extension. For users on Windows 10, finding this Outlook email backup file is the first line of defence against potential data loss. You can then preserve the backup file on a USB storage, external hard drive, or cloud services, e.g., OneDrive.
Have you ever tried Outlook Conversation View? It could be a real game-changer to boost your productivity!
How to Restore Outlook Emails, Contacts, and Calendars from an Outlook Backup
If you have already created a backup of your Outlook data (Emails, Contacts and Calendar), you can easily restore it on a PC or Mac. For Outlook email backup restoration, arrange the backup file on your PC or Mac and follow the steps below.
Step 1:
Open Microsoft Outlook and navigate to ‘File’ > ‘Open & Export’ > ‘Import/Export’ to open the wizard.
Step 2:
Choose ‘Import from another program or file’ and click ‘Next’.
Step 3:
Select ‘Outlook Data File (.pst)’, hit ‘Next’.
Step 4:
Browse to your Outlook email backup folder and choose the backup file. Also, choose what to do with the duplicate items.
You may need to apply a password if the backup file is password-protected.
Step 5:
Select the destination email folder and click ‘Finish’.
Final Thoughts on Safeguarding Your Outlook Data
Mastering the Outlook email backup and restore process is a critical skill for ensuring the safety of your valuable data. Following the five simple steps outlined in this guide, you can easily safeguard your emails from data loss or corruption. Whether you’re looking to protect your personal communications or secure business correspondence, the peace of mind that comes with a reliable backup strategy is invaluable.
Follow the UplifeWay blog for more Outlook tips & tricks!
FAQ
Where is Outlook email backup saved?
On Windows PC, your Outlook email backup is typically saved in the Documents\Outlook Files directory. You can find your backup file at the following path:C:\Users\USER_NAME\Documents\Outlook Files\backup.pst
Alternatively, if you are using OneDrive for your documents, the backup might be located in:C:\Users\USER_NAME\OneDrive\Documents\Outlook Files\backup.pst
Remember to replace “USER_NAME” with your Windows username to navigate to the directory where your Outlook backup (.pst) file is stored.
Can you backup all Outlook emails?
Yes, you can backup all Outlook emails by following the steps below:
Step 1: Open Microsoft Outlook and navigate to ‘File’ > ‘Open & Export’ > ‘Import/Export’ to open the wizard
Step 2: Select ‘Export to a file’, then click ‘Next’
Step 3: Choose ‘Outlook Data File (.pst)’ and the folders you want to backup, and click ‘Next’
Step 4: Decide on a destination for your backup file
Step 5: Choose what to do with the Duplicate items and click ‘Finish’.
How do I backup my Outlook emails to a USB?
To back up your Outlook emails onto a USB stick or a hard drive, begin by creating a .pst file containing your email data. Start Outlook and go to ‘File’ > ‘Open & Export’ > ‘Import/Export’ to launch the import/export wizard. Choose ‘Export to a file’, proceed by selecting ‘Outlook Data File (.pst)’, and pick the specific Outlook folders you wish to include in the backup. Next, you’ll be prompted to select a save location for the .pst file and click ‘Finish’. Once your .pst file is ready, locate it in the previously decided destination, copy it using ‘Ctrl+C’, and transfer it to your chosen external storage device with ‘Ctrl+V’.
How do I download my email backup?
You can download all your Outlook emails very easily. Begin by creating a .pst file containing your email data. Start Outlook and go to ‘File’ > ‘Open & Export’ > ‘Import/Export’ to launch the import/export wizard. Choose ‘Export to a file’, proceed by selecting ‘Outlook Data File (.pst)’, and pick the specific Outlook folders you wish to include in the backup. Next, you’ll be prompted to select a save location for the .pst file and click ‘Finish’. Now, this .pst file contains all your Outlook emails, which you can restore to another Outlook client, transfer to a Mac or PC or simply save on a USB storage device.

“Hey there, welcome to UplifeWay.com! I’m Rifat Hossain, a Microsoft 365 certified trainer with a background in Advanced Engineering Management. Currently, I’m navigating the tech landscape as the Digital Services Manager at Coats, providing a unique perspective on technology in the professional world.
My journey, fueled by a passion for helping others, has led to the creation of this blog. UplifeWay.com is your go-to source for mastering Microsoft Office applications and elevating your digital literacy. Join me on the exciting journey of smart productivity at UplifeWay.com – let’s explore the world of tech together!”