Setup Out of Office and Send Automatic Replies from Outlook for Mac in 8 Easy Steps
Key Takeaway
You can set out of office status and send automatic replies in Outlook for Mac by following 8 simple steps:
- Step 1: Open Outlook for Mac
- Step 2: Go to “Tools” and select “Automatic Replies”
- Step 3: Choose the email account (if you have multiple)
- Step 4: Enable automatic replies
- Step 5: Craft your reply
- Step 6: Set the time period (optional)
- Step 7: Enable auto-reply for external senders (Optional)
- Step 8: Craft reply for external senders
Introduction
Navigating through Microsoft Outlook for Mac to enable automatic replies (often referred to as “Out of Office” or OOO messages) can be straightforward once you’re aware of the correct procedures to follow. If you are using Outlook application on a Mac, the steps are quite different than Outlook in Windows or Outlook web. This guide will walk you through how to set Out of Office Replies from Outlook for Mac in the right way.
You might also be interested in our blog post How to Show Working Elsewhere in Outlook Calendar and 4 Ideal Scenarios for Its Use.
Setting Up an Automatic Reply in Outlook for Mac
When you’re planning to be away from your email for a while, it’s professional and courteous to set up an automatic response to let your contacts know. Here’s how to set an out of office reply in Outlook for Mac:

Step 1: Open Outlook for Mac
Firstly, ensure that you are using the latest version of Outlook for your Mac to avoid any issues such as the “out of office feature not available” or the “automatic replies greyed out” problem.
Step 2: Go to “Tools” and Select “Automatic Replies”
On the Outlook menu bar at the top of your screen, click on “Tools”. In the dropdown menu, select “Automatic Replies…”.
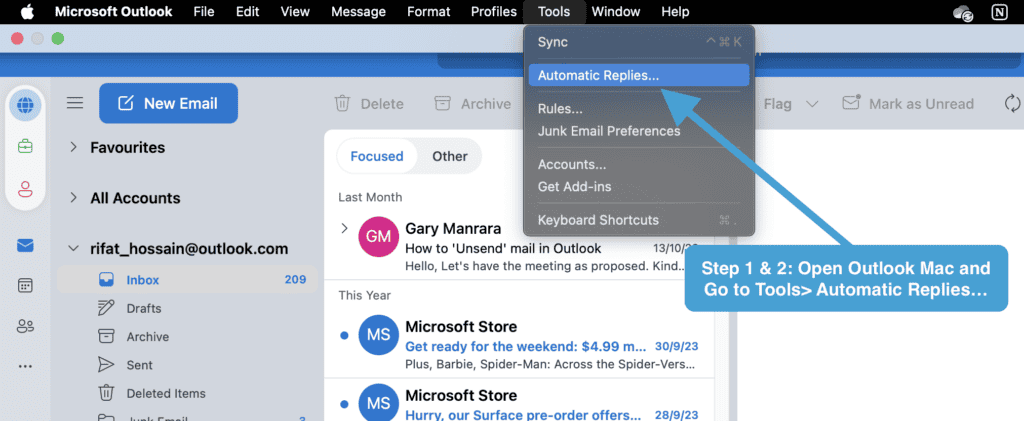
Step 3: Choose the Email Account
If you have multiple accounts set up in your Outlook client, you must select the specific account for which you want to activate the OOO replies. If you have just one email account, just skip it!
Step 4: Enable Automatic Replies
In the “Out of Office” window, you’ll see a check box to turn on automatic replies. Enable it.
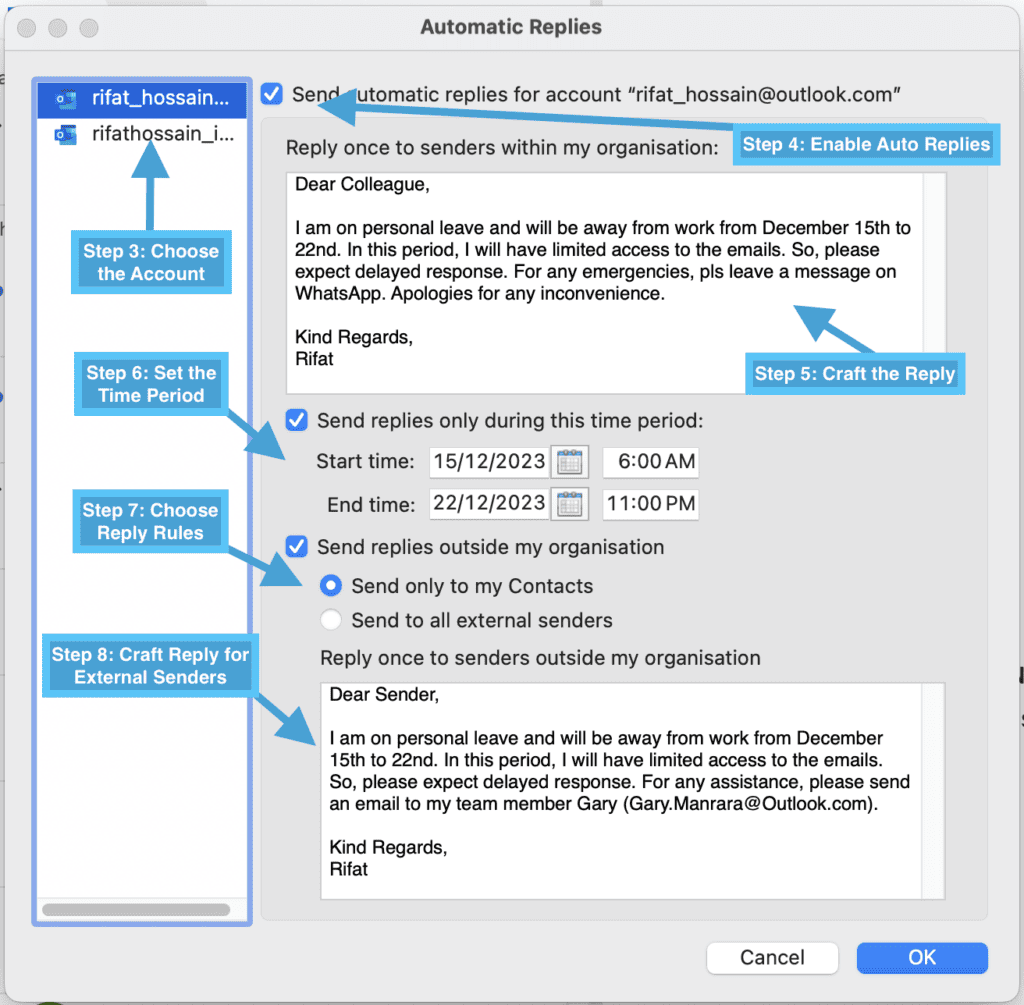
Step 5: Craft Your Reply
Compose your out of office message in the provided text box. The first box is for the senders within your organization. You can customize the message for the senders from outside your organization in a second text box.
Step 6: Set The Time Period (Optional)
Specify the duration of your absence by setting a start and end date for automatic replies. This ensures that your contacts are informed only during the period of your unavailability. You can also leave this option unselected but keep in mind that you will then need to manually disable the Out of Office response upon your return from vacation.
Step 7: Enable OOO for External Senders (Optional)
Next, you can also turn on automatic replies for the external senders (people outside of your organization).
Step 8: Craft Your Reply for External Senders
You have the option to compose a separate Out of Office message for external senders using the second text box provided.
Finally, click OK to turn on the Out of Office status and automatic reply!
If you are not a great reader like me, watch this video tutorial instead!
Troubleshooting Common Out of Office Issues on Mac
Why is Out of Office option is not available in Outlook for Mac?
In the latest version of Outlook for Mac, the ‘Out of Office’ feature has been renamed to ‘Automatic Replies.’ If you can’t locate ‘Out of Office,’ you are likely using the new version where you can find the feature under the ‘Tools’ menu, labelled as ‘Automatic Replies.’
Why is automatic replies greyed out in Outlook for Mac?
This usually indicates a problem with the server connection or access permissions. Check your network connectivity and ensure your Outlook is connected to the Exchange or Microsoft 365 server.
Final Thoughts
By following the above steps and troubleshooting common issues, you can set up an out-of-office reply in Outlook for Mac and enjoy your time away from email with the peace of mind that your contacts are informed of your absence.
FAQ
How do I set up an out of Office reply in Outlook for Mac?
For both new and legacy Mac users, setting up an out-of-office reply involves accessing the Tools tab in Outlook, selecting either Automatic Replies or Out of Office, and filling in the necessary message fields. Set the duration if needed and activate the replies by clicking OK.
How do I set up automatic OOO in Outlook?
In Outlook for Mac, use the Automatic Replies (new versions) or Out of Office (legacy versions) feature under the Tools tab to set up your automatic Out of Office notifications.

“Hey there, welcome to UplifeWay.com! I’m Rifat Hossain, a Microsoft 365 certified trainer with a background in Advanced Engineering Management. Currently, I’m navigating the tech landscape as the Digital Services Manager at Coats, providing a unique perspective on technology in the professional world.
My journey, fueled by a passion for helping others, has led to the creation of this blog. UplifeWay.com is your go-to source for mastering Microsoft Office applications and elevating your digital literacy. Join me on the exciting journey of smart productivity at UplifeWay.com – let’s explore the world of tech together!”